The first step is to decide if you want to refinish your cabinets before or after installing new countertops. This choice is completely up to you, but it’s important to consider the impact your decision will have on your kitchen.
If you choose to restain your cabinets, avoid strong orange, yellow or red hues, as they will look dated (unless you’re going for the retro look). Contact Cabinet Refinishing San Jose CA for more information.
Choose Your Colors
Before you start sanding, removing hardware, and sanding again, it’s essential to set your color scheme. While some homeowners may think that this isn’t a big deal, it can be the difference between your new kitchen’s success or failure.
Choosing the right colors for your cabinets can be a daunting task, but if you know where to start it can be much easier. A great way to start is with the pieces that cover the most space in the room, the cabinets and countertops. When choosing a color for your cabinets, it’s important to stick with something that is neutral enough to transition through trends and last you years. This can also help you create a custom look that can be complemented with other elements like window treatments, rugs, furniture, and decor.
The good news is that cabinets can be refinished in almost any shade, so finding the perfect match isn’t impossible. A great place to start is with a few core colors, including one main and two accent colors. You should gravitate towards neutrals, but if you want to incorporate something bold, do so sparingly as an accent. Once you’ve settled on your core colors, collect samples of cabinet, flooring, and countertop materials to see what they look like together.
While many people upgrade their kitchens by only doing a cabinet refinishing in Utah, it’s always a good idea to include the countertops and flooring when possible. This will save you a lot of time and money, and it’s a lot easier to address any mismatched flooring or countertops than trying to correct them after the fact.
It’s also a good idea to include the countertops and floors in your cabinet refinishing project because these surfaces sustain a lot of abuse and can quickly become outdated or damaged. A common mistake is to install a statement surface like patterned countertops with oak cabinets or maple cabinets with a dark stain.
Decide on a Finish
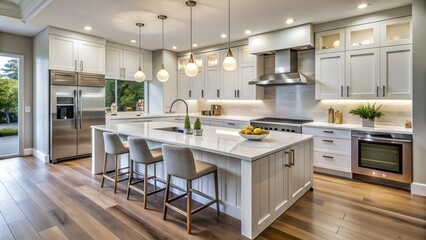
While it’s easy to get caught up on color selection, it’s equally important to select a cabinet finish that coordinates with your new countertops or backsplash. These surfaces act as the anchor pieces in your kitchen and will influence how you style your cabinets and other elements, including hardware and fixtures. A consistent color story across all three surfaces creates a polished look that’s sure to impress your guests and family members. Choose either warm tones (like beiges, creams, or honey wood looks) or cool tones (like grays, charcoals, or crisp whites) to ensure a smooth transition between your countertops, backsplash, and cabinets.
If your cabinets are in good condition and have a clean surface, they can be repainted or stained to match your new countertops and flooring. This is a less costly and more permanent option than replacing your cabinet doors or drawer fronts. However, keep in mind that refinishing may take longer than replacing, especially if your cabinets are old or have heavy wear and tear.
Before you begin, remove all the cabinet doors and drawer fronts, labeling each for easy reassembly later. Set up a staging area to work in and cover up appliances, backsplashes, and floors to protect them from dust during the refinishing process. It’s also a good idea to set up an exhaust system in your workspace, as fumes from the paint and stain can be unpleasant.
Once your cabinet boxes are clean and dry, sand them down with a medium-grit sanding sponge or 180-grit sandpaper on a random orbital sander. Scuff-sanding your surfaces promotes topcoat adhesion and also helps remove any imperfections or rough edges from the original coating. After sanding, vacuum and tack-rag the surfaces to remove all lingering dust particles.
Next, prime the cabinetry with a high-quality oil primer like KILZ 3(r) Premium Primer. This type of primer dries quickly and is low-odor, allowing you to remain home during the refinishing process. Finally, re-vacuum and tack-rag the surfaces to make sure they are completely clean and dust-free. This is the perfect opportunity to caulk around any cracks where your cabinet boxes meet walls or crown molding.
Pick Your Hardware
Your cabinet hardware is a major component of your kitchen’s overall look, and it has the potential to pull together or clash with your countertops or floors. The good news is that you can choose from a wide range of options to match your new color scheme, and even change up the style if necessary. The key is to find a finish that complements the rest of your space while still making a statement.
Before you begin the refinishing process, lay down protection to protect your floors and countertops from paint drips and splatters. Canvas drop cloths are a popular choice, but builder’s paper is also affordable and easy to use. Be sure to cover appliances, backsplashes and floors, and set up a staging area where you can work.
The next step is to clean your cabinets thoroughly. Scrape off food residue, then wash and scrub them with soap, water, synthetic steel wool, and trisodium phosphate (TSP). Use a soft cloth or sponge to wipe down surfaces and allow them to dry completely before continuing. TSP emulsifies grease and grime, which makes it easier to remove from wood and laminate surfaces.
Once your cabinets are cleaned, sand the surface using medium-grit sanding sponges or 180-grit sandpaper on a random orbital sander. Afterward, vac and tack-rag the surfaces to ensure they’re free of dust and debris. Once your cabinets are sanded and clean, apply primer to prepare them for topcoat application. A high-quality primer like KILZ 3 Premium Primer offers superior adhesion, and it dries quickly to give you the time you need to complete the project.
After your primer is fully dried, it’s time to start reassembling your kitchen. Begin by removing all doors and drawers, labeling each piece as you go to ensure smooth reassembly later on. Once all the pieces are back in place, install any new knobs and handles. Then, do a walk-through to spot any touch-ups that may need attention and then step back and admire your hard work. The results will be worth it!
Get Started
Choosing the right color for your flooring and countertops is an important decision. The colors you choose will last several years and may even be part of your home’s overall design for decades, so it’s best to take the time to think through the process carefully and consult with a design professional. Ultimately, you’ll want to find countertops and cabinets that harmonize with the rest of your kitchen design to create a cohesive style.
It’s common to match cabinets and floors for a clean, uniform look, but you can also use contrasting colors to add visual interest. For example, if you have dark wood floors, you can use light-colored cabinets for a dramatic contrast. Or, you could use a neutral color like gray to coordinate with the floor and provide a transition between the two.
A popular trend is to mix cabinet finishes and materials, especially if you have different shades of the same color. For example, navy blue on the island and white around the perimeter is a beautiful combination. You’ll want to select a countertop material that pulls these shades together, such as quartz with subtle veining or granite with specks that echo both the blue and the white.
Similarly, you can use a darker color on the walls to complement your cabinets. This will give the room a warm, inviting feel and make it feel larger. If you have wood floors, a dark paint such as espresso will work well. For a more natural look, try a soft gray or cream.
You can also opt for a neutral backsplash to add a pop of color without overwhelming the cabinets. Alternatively, you can use a patterned backsplash that picks up on one of the cabinet colors for a more integrated look.
It’s also important to consider how the materials will hold up to daily wear and tear. For example, granite and quartz are extremely durable and can withstand heat and moisture. However, wood and painted surfaces are more vulnerable to stains. You’ll want to choose a finish with a low sheen that will be easy to keep clean.